
How Nail Artists Create Patterns: Techniques and Tips
- Bradenton Salon Today
- May 21
- 9 min read
Most people assume intricate nail art is the result of natural talent. It isn’t. Understanding how nail artists create patterns comes down to specific tools, repeatable techniques, and structured practice. Whether you’re drawn to delicate florals, bold geometric lines, or sculpted 3D textures, the path from bare nail to finished design follows methods anyone can learn. This guide breaks down exactly what professionals use and how they work, from surface preparation and stamping to wave gel and freehand florals.
Table of Contents
Key takeaways
Point | Details |
Prep is non-negotiable | A smooth, properly filed base is what separates crisp patterns from smudged ones. |
Tools make the difference | Kolinsky sable brushes and stainless steel dotting tools give precision that improvised tools cannot. |
Stamping speeds up complex designs | Metal stamping plates let you replicate intricate patterns consistently without advanced freehand skills. |
3D textures require material knowledge | Builder gel and acrylic behave differently. Knowing which to use saves time and prevents mistakes. |
Imperfection has a place | In floral and organic designs, slight irregularity adds natural charm rather than detracting from the look. |
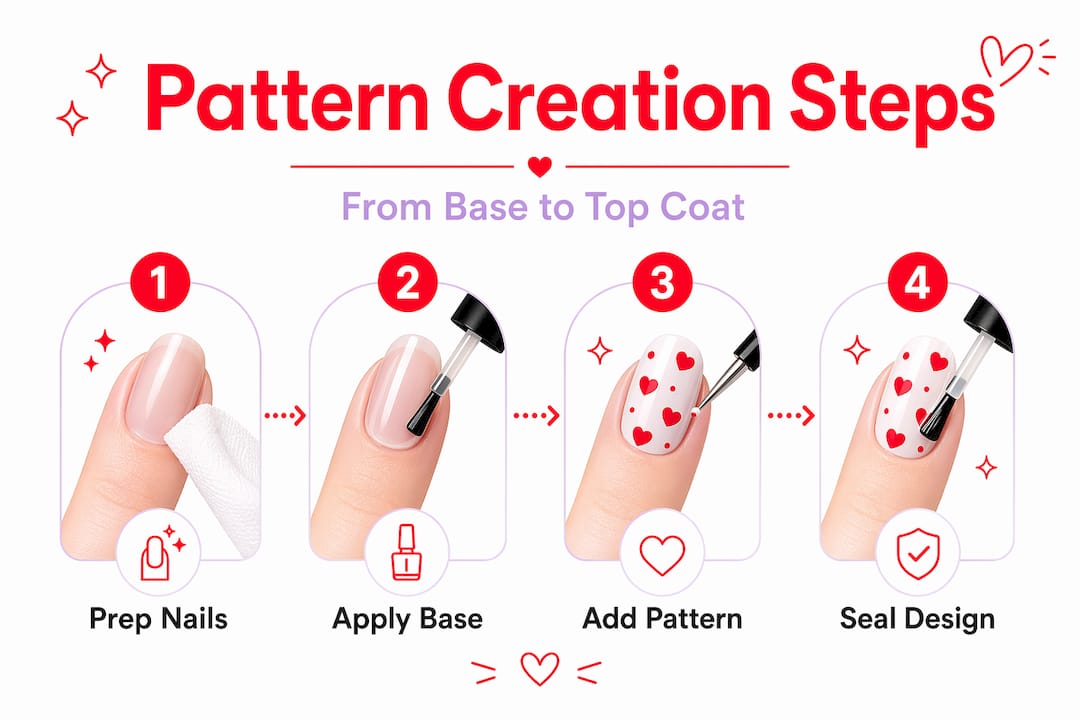
How nail artists create patterns: starting with the right foundation
Before a single design stroke happens, the nail surface needs to be ready. This step is where most beginners lose before they start.
A smooth, even base with two thin layers of base color, cured thoroughly and lightly buffed with a 180-grit file, creates the grippy, level surface that polish and gel actually bond to. Skip this and even the most careful freehand work will pool, bubble, or peel. The file removes the shine and gives the next layer something to hold onto. After that buffing step, a tacky layer cured under the lamp locks everything in place before detail work begins.
Lighting matters more than most guides admit. Resting your pinky on a stable surface while using a 3x to 5x magnifying lamp lets you catch errors before they dry and keeps your hand steady through detail strokes. Good lighting is not a luxury for nail artists. It’s a functional tool.
The tools that actually do the work
Here’s what separates a professional result from a frustrating one:
Kolinsky sable brushes (sizes #000 and #00): Kolinsky sable holds more product than synthetic brushes due to its microscopic natural hair structure. This means smoother strokes, finer lines, and fewer dips mid-stroke.
Stainless steel dotting tools: These come in varied tip sizes and deliver uniform dots with consistent polish load. Toothpicks and bobby pins work in a pinch, but they produce uneven shapes that undermine the whole design.
Striping tape and nail wheels: For geometric lines and clean edges, striping tape acts like a stencil. Apply it after the base dries, paint over it, and peel carefully before the top layer sets fully.
Pro Tip: Wipe 70% of the polish off the brush on the bottle neck before touching nail to brush. This single habit eliminates pooling and creates sharper, more controlled strokes almost immediately.
Polish consistency also matters. If your polish is thick or gummy, thin it with a drop of acetone-free thinner before detail work. Thick polish drags and clumps. Thin, fluid polish glides.
Nail stamping for consistent, intricate patterns
Stamping is one of the most underrated nail art pattern techniques available to both beginners and experienced artists. It lets you transfer designs that would take 20 minutes to freehand in under two minutes, with repeatable accuracy.
The core tools are simple: a metal stamping plate with etched designs, a scraper (usually a card or flat metal tool), a stamper with a silicone or rubber head, and stamping polish that is thicker and more opaque than regular nail polish. That thickness is what makes the transfer work. Regular polish dries too fast and doesn’t pick up cleanly.
Here’s the step-by-step stamping process:
Apply and cure your base coat and base color.
Let the base color dry thoroughly before stamping. Any tackiness will cause the design to smear or lift.
Apply stamping polish directly over the etched design on the plate. Work quickly.
Scrape off the excess in one firm, even stroke. This leaves polish only in the etched lines.
Press the stamper head firmly onto the plate and roll slightly to pick up the full design.
Press the stamper onto the nail with light, even pressure and roll off cleanly.
Seal with a top coat once the transfer is fully set.
Method | Best for | Skill level required | Speed |
Standard stamping | Repeating one motif across all nails | Beginner | Fast |
Reverse stamping | Building layered color into a design before transfer | Intermediate | Moderate |
Layered stamping | Overlapping two stamps for complex patterns | Intermediate | Moderate |
Freehand over stamp | Adding personal detail to a stamped base | Advanced | Slow |
Reverse stamping is worth learning once you’re comfortable with the basics. You color sections of the stamp design directly on the plate using multiple polishes, then pick it up and transfer the fully colored design in one step. The result looks hand-painted but is far more consistent.
The most common stamping mistake is pressing too hard or rolling the stamper unevenly. Light, confident pressure works better. Practice on a flat surface like a silicon mat before moving to the nail.
Creating dimensional textures with 3D sculpting and wave gel
If you want patterns that go beyond the flat surface, 3D nail art uses builder gel or acrylic to sculpt raised designs with actual physical texture. The visual impact is completely different from painted designs, and the techniques require a bit more patience to develop.
The key difference between the two main materials:
Builder gel: Stays workable and pliable until you cure it under a UV lamp. This gives you time to refine the shape, smooth edges, and adjust placement before anything sets. Great for beginners to 3D work.
Acrylic: Hardens in 30 to 60 seconds after mixing the monomer and powder. That speed demands confident, decisive movements. You don’t get to go back and adjust. Experienced sculptors often prefer acrylic for flowers and bows because of the crispness it produces when handled well.
Wave gel sits in its own category. It holds organic textures like ocean waves and sand dunes and cures permanently in those shapes. The result is a tactile, ripple-like surface that looks almost geological. A single application can create a full design without layering multiple products. This makes it one of the most efficient methods for dimensional nail patterns.
Material | Working time | Best designs | Finish type |
Builder gel | Until UV cured | Flowers, geometric shapes | Smooth, glossy |
Acrylic | 30 to 60 seconds | Bows, roses, sculpted details | Crisp, matte or glossy |
Wave gel | Until UV cured | Ocean textures, organic flowing patterns | Dimensional, tactile |
Popular 3D designs right now include sculpted flowers with layered petals, oversized bows, and textured chrome finishes. Chrome croc designs are a particularly striking example. Layered blooming gel and chrome powder creates a reptilian surface texture that catches light in every direction. The key to that look is patience and layering discipline. Rush it, and the texture looks muddy. Take your time between layers, and the pattern reads as intentional and sophisticated.
If you’re working with acrylics for the first time, consider reading up on safe acrylic removal before you start. Knowing how to take things off without damage is just as important as knowing how to apply them.
Floral designs and the art of intuitive pattern-building
Floral nail art is where many aspiring artists get stuck. They aim for perfect symmetry, get frustrated when the petals don’t match, and abandon the design. This is the wrong approach entirely.
Floral nail art benefits from imperfect petals and a dotting tool center that ties the whole design together. Natural flowers aren’t perfectly symmetrical. Slightly irregular petals read as organic and real, which is exactly what makes a floral design look finished rather than stiff.
The process works like this:
Load a small round brush with translucent color and place petal shapes loosely around a central point. Don’t overthink placement.
Layer a slightly deeper shade on the outer edges of each petal for dimension. Cure between layers if using gel.
Use a dotting tool to add a cluster of small dots at the center. This grounds the whole design and draws the eye.
Finish with a glossy top coat, and use a thin cleanup brush dipped in acetone to sharpen any edges that bled.
Pro Tip: When working with translucent layered petals, build color gradually. One thin layer is never enough. Two or three layers with curing in between creates the depth that makes a floral design look like something a professional painted. A single thick layer looks flat and loses that watercolor-like quality entirely.
For nail artist pattern ideas that work on shorter nails, manicure styles for short nails often feature miniature florals and dot clusters that scale beautifully without overcrowding the nail surface.
The top coat step is not optional. A proper top coat seals the design, protects layers from chipping, and adds the finish that gives the whole look intentionality. Gel top coats cured under UV last significantly longer than air-dry formulas on complex designs.
My honest take on what actually builds nail art skill
I’ve watched a lot of people sit down with the right polish and completely average brushes, then wonder why their lines look shaky. In my experience, the single biggest jump in quality comes not from more practice but from switching to proper tools first.
When I started using Kolinsky sable brushes instead of the brushes that came with nail art kits, the difference in my line work was immediate. Not gradual. Immediate. The brush held its point through the full stroke instead of splaying out halfway through. That one change made everything else I’d practiced actually show up in the finished nail.
The second thing I’ve learned is that preparation is where most of the work happens. The actual design takes a fraction of the time compared to surface prep, curing, and cleanup. People underestimate this and then blame their technique when the real problem is a base that wasn’t smooth or a layer that wasn’t fully cured.
Mistakes are not setbacks in nail art. They’re calibration. I’ve learned more from a smudged stamp or a petal that went the wrong direction than from any tutorial. The challenge is slowing down enough to actually notice what went wrong and why. Most errors happen in two seconds. Most improvements happen because you sat with those two seconds long enough to understand them.
If you want to explore abstract nail designs as a way to practice without the pressure of a specific pattern, start there. Abstract work rewards experimentation and teaches you how color, pressure, and tool angle interact before you commit to structured designs.
— MinhHieu
See what professional nail art looks like in person
If you’ve been practicing at home and want to see these techniques applied by skilled technicians, a visit to a professional salon is genuinely worth your time.

At Bradentonnails, the team at TJ Nails in Bradenton, FL specializes in exactly the kind of work covered in this guide, from detailed floral gel manicures to 3D sculpted designs and custom patterns. Seeing professional work up close gives you a reference point that no tutorial can fully replicate. You can also explore SNS dipping services as a durable base option for nail art that needs to last. Book an appointment online at Bradentonnails or stop in to talk through what designs you want to try. The team is there Sunday through Saturday, and they welcome both walk-ins and bookings.
FAQ
What tools do nail artists use to create patterns?
Nail artists rely on Kolinsky sable brushes for fine line work, stainless steel dotting tools for dots and floral centers, stamping plates for repeatable designs, and striping tape for clean geometric edges.
How does nail stamping work?
Stamping transfers an etched design from a metal plate to the nail using a thick stamping polish and a silicone stamper head, allowing intricate patterns to be applied in seconds.
What is wave gel used for in nail art?
Wave gel creates raised, organic textures like ocean waves or rippled sand that cure permanently, making it one of the fastest methods for dimensional nail designs.
How do you create floral nail patterns without them looking stiff?
Use irregular petal shapes rather than aiming for symmetry, layer translucent shades for depth, and finish with a dotting tool cluster at the center to ground the whole design.
What is the difference between builder gel and acrylic for 3D nail art?
Builder gel stays workable until UV cured, giving you time to adjust shapes. Acrylic sets in 30 to 60 seconds and requires faster, more decisive sculpting but produces very crisp finished details.
Recommended
Comments